Background
In the context of AI large model training, Model Parallelism divides the model across multiple nodes, requiring frequent and substantial data exchange between these nodes during training. At this point, the network transmission performance between nodes often becomes the bottleneck of training, significantly affecting training efficiency. Data centers have diverse network types (such as IB, RoCE, NVSwitch, etc.), and the network topology is complex, typically involving multiple layers of switches. The fewer switches between two nodes, the lower the communication latency and the higher the throughput. Therefore, users want to schedule workloads to the best performance domain with the highest throughput and lowest latency, minimizing cross-switch communication to accelerate data exchange and improve training efficiency.
To address this, Volcano proposed the Network Topology Aware Scheduling strategy, which uses a unified network topology API and intelligent scheduling policies to solve the network communication performance issues in large-scale data center AI training tasks.
Features
Unified Network Topology API: Accurately Expressing Network Topology
To shield the differences in data center network types, Volcano defines a new CRD HyperNode to represent the network topology, providing a standardized API interface. Compared to the traditional method of using node labels to represent network topology, HyperNode has the following advantages:
- Unified Semantics: HyperNode provides a standardized way to describe network topology, avoiding the semantic inconsistency issues of the label method.
- Hierarchical Structure: HyperNode supports a tree-like hierarchical structure, allowing for more precise representation of the actual network topology.
- Easy Management: Cluster administrators can manually create HyperNodes or use network topology auto-discovery tools to maintain HyperNodes.
A HyperNode represents a network topology performance domain, typically mapped to a switch or tor. Multiple HyperNodes are connected hierarchically to form a tree structure. For example, the following diagram shows a network topology composed of multiple HyperNodes:
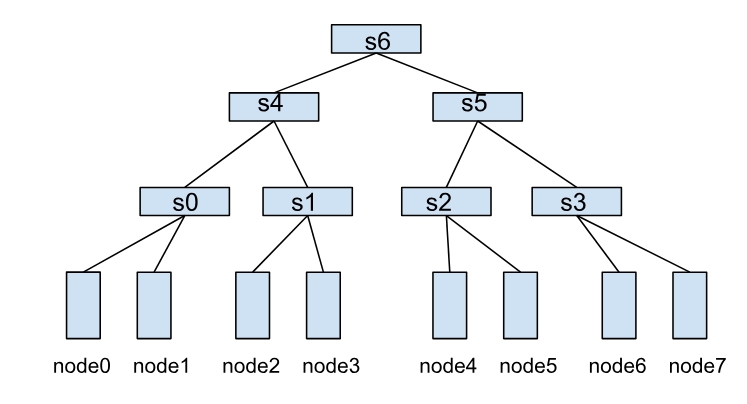
- Leaf HyperNodes (s0, s1, s2, s3): The child node type is the real nodes in the cluster.
- Non-leaf HyperNodes (s4, s5, s6): The child node type is other HyperNodes.
In this structure, the communication efficiency between nodes depends on the HyperNode hierarchy span between them. For example:
- node0 and node1 belong to s0, achieving the highest communication efficiency.
- node1 and node2 need to cross two layers of HyperNodes (s0→s4→s1), resulting in lower communication efficiency.
- node0 and node4 need to cross three layers of HyperNodes (s0→s4→s6), resulting in the worst communication efficiency.
Key Fields
- spec.tier: Represents the hierarchy of the HyperNode. The lower the tier, the higher the communication efficiency between nodes within the HyperNode.
- spec.members: A group of child nodes under the HyperNode, which can be matched using a selector.
- spec.members[i].type: The type of child node, supporting
NodeandHyperNode. When all child nodes areNode, the current HyperNode is a leaf node. When all child nodes areHyperNode, the current node is a non-leaf HyperNode. spec.members[i].selector: Child node selector, supporting
exactMatch,regexMatch, andlabelMatch.exactMatchmeans exact matching, where the child node needs to fill in the full name of the HyperNode or Node.regexMatchmeans regular expression matching, where nodes matching the regular expression are treated as child nodes of the current HyperNode.labelMatchmeans matching by labels. Nodes with corresponding labels will be considered child nodes of the current HyperNode. An example configuration is:labelMatch: matchLabels: topology-rack: rack-1
Note:
regexMatch/labelMatchcan only be used in leaf HyperNodes to match real nodes in the cluster. Whenspec.members[i].selector.typeisHyperNode,regexMatch/labelMatchis not supported.
Network Topology Aware Scheduling Policy
Volcano Job and PodGroup can set the topology constraints of the job through the networkTopology field, supporting the following configurations:
- mode: Supports
hardandsoftmodes.hard: Hard constraint, tasks within the job must be deployed within the same HyperNode.soft: Soft constraint, tasks are deployed within the same HyperNode as much as possible.
- highestTierAllowed: Used with
hardmode, indicating the highest tier of HyperNode allowed for job deployment. This field is not required whenmodeissoft.
For example, the following configuration means the job can only be deployed within HyperNodes of tier 2 or lower, such as s4 and s5, and their child nodes s0, s1, s2, s3. Otherwise, the job will remain in the Pending state:
spec:
  networkTopology:
    mode: hard
    highestTierAllowed: 2
Through this scheduling strategy, users can precisely control the network topology constraints of the job, ensuring that the job runs in the best performance domain that meets the conditions, thereby significantly improving training efficiency.
HyperNode Auto-Discovery: Simplifying Network Topology Management
To further reduce the management burden of network topology information, Volcano provides the HyperNode auto-discovery feature. This feature automatically discovers network topology structures within clusters and creates, updates, or deletes corresponding HyperNode Custom Resources (CRs) based on the discovery results.
The auto-discovery feature offers the following key benefits:
- Automated Management: Automatically discovers and maintains HyperNode information from various data sources (such as UFM, RoCE, or node labels), eliminating the need for manual maintenance.
- Real-time Updates: Periodically synchronizes network topology changes to ensure HyperNode information remains current with the actual network state.
- Extensible Architecture: Supports pluggable Discoverer components, allowing users to develop custom discovery logic for their specific network management tools.
Through this automated discovery mechanism, users can focus on job scheduling configuration without worrying about the complexities of HyperNode creation and maintenance, significantly simplifying the deployment and management of network topology-aware scheduling.
User Guide
Installing Volcano
Volcano can be installed using either of the following methods:
Using Helm (Recommended)
helm repo add volcano-sh https://volcano-sh.github.io/helm-charts
helm repo update
helm install volcano volcano-sh/volcano -n volcano-system --create-namespace --version 1.12.0
Using YAML file
kubectl apply -f https://raw.githubusercontent.com/volcano-sh/volcano/refs/heads/network-topology/installer/volcano-development.yaml
Configure the Volcano Scheduler
To enable the network topology-aware scheduling feature, you need to modify the Volcano scheduler’s configuration file. Below is an example configuration that enables both the network-topology-aware and binpack plugins; enabling binpack helps achieve more compact task scheduling:
kind: ConfigMap
apiVersion: v1
metadata:
  name: volcano-scheduler-configmap
  namespace: volcano-system
data:
  volcano-scheduler.conf: |
    actions: "enqueue, allocate, backfill"
    tiers:
    - plugins:
      - name: priority
      - name: gang
    - plugins:
      - name: predicates
      - name: proportion
      - name: nodeorder
      - name: binpack # Enable binpack plugin to help with compact task scheduling
      # arguments: # Used to configure the weights of various resources in the binpack plugin and the binpack plugin's own weight
      #   binpack.weight: 10 # Weight of the binpack plugin, affects the overall score of the binpack strategy
      #   binpack.cpu: 5 # CPU resource weight, higher weight means greater proportion of CPU resources in scoring
      #   binpack.memory: 1 # Memory resource weight
      #   binpack.resources: nvidia.com/gpu # Specify extend resources
      #   binpack.resources.nvidia.com/gpu: 2 # GPU weight
      - name: network-topology-aware # Enable network-topology-aware plugin
      # arguments:
      #   weight: 10 # Optionally set the scoring weight for network-topology-aware, default weight is 1
HyperNode CRs Management
HyperNode CRs can be managed through auto-discovery or manual creation.
HyperNode Auto-Discovery (Recommended)
Volcano achieves automatic discovery and management of HyperNodes by integrating pluggable network topology discovery tools (Discoverers). Discoverers are responsible for periodically collecting network topology information from external network topology management systems (such as UFM, RoCE, or based on node labels) and converting it into a standard HyperNode representation. Subsequently, Volcano’s built-in HyperNode Controller automatically creates, updates, or deletes the corresponding HyperNode Custom Resources (CRs) based on the information provided by the Discoverers. This mechanism enables the Volcano scheduler to utilize dynamically maintained HyperNode CRs for precise network topology-aware scheduling, thereby eliminating the burden of manually creating and maintaining HyperNode information for users and simplifying the complexity of network topology management.
Volcano provides several common Discoverer implementations to suit typical network environments. Additionally, Volcano supports users in developing custom Discoverer plugins based on their specific network topology discovery tools and requirements.
Configuration
The HyperNode auto-discovery feature is configured via a ConfigMap. The ConfigMap contains the configuration for the discovery sources, such as UFM, RoCE, and label. You can modify the configuration according to your own cluster environments.
Secret Configuration (Required for UFM source)
If your cluster’s underlying network uses InfiniBand (IB) networking and is managed by UFM (Unified Fabric Manager), you must first create a Kubernetes Secret to store your UFM credentials when configuring UFM as a discovery source:
kubectl create secret generic ufm-credentials \
  --from-literal=username='your-ufm-username' \
  --from-literal=password='your-ufm-password' \
  -n volcano-system
Note: Replace
your-ufm-usernameandyour-ufm-passwordwith your actual UFM credentials, and adjust the namespace if needed.
ConfigMap Example
apiVersion: v1
kind: ConfigMap
metadata:
  name: volcano-controller-configmap
  namespace: volcano-system # Replace with your actual Volcano namespace if Volcano is not installed in the default namespace.
data:
  volcano-controller.conf: |
    networkTopologyDiscovery:
      - source: ufm
        enabled: true
        interval: 10m
        credentials:
          secretRef:
            name: ufm-credentials # Replace with the secret name that stores the UFM credentials.
            namespace: volcano-system # Replace with the secret namespace that stores the UFM credentials.
        config:
          endpoint: https://ufm-server:8080
          insecureSkipVerify: true
      - source: roce
        enabled: false
        interval: 15m
        config:
          endpoint: https://roce-server:9090
      - source: label
        enabled: true
        config:
          networkTopologyTypes:
            topologyA2:
              - nodeLabel: "volcano.sh/tor" # The label that indicates which tor a node belongs to. If the values corresponding to this label on different nodes are the same, it means these nodes belong to the same tor.
              - nodeLabel: "kubernetes.io/hostname" # A standard label automatically added to each node in a Kubernetes cluster, used to identify the hostname of the node.
            topologyA3:
              - nodeLabel: "volcano.sh/hypercluster" # The label that indicates which hypercluster a node belongs to. If the values corresponding to this label on different nodes are the same, it means these nodes belong to the same hypercluster.
              - nodeLabel: "volcano.sh/hypernode" # The label that indicates which hypernode a node belongs to. If the values corresponding to this label on different nodes are the same, it means these nodes belong to the same hypernode.
              - nodeLabel: "kubernetes.io/hostname" # A standard label automatically added to each node in a Kubernetes cluster, used to identify the hostname of the node.
Configuration Options
source: The discovery source, e.g.,ufm.enabled: Whether to enable this discovery source.interval: The time interval between discovery operations. If not specified, the default value is 1 hour.config: The configuration for the discovery source. Configuration options vary depending on the discovery source.credentials: Credential configuration for accessing the discovery source.secretRef: Reference to a Kubernetes Secret containing credentials.name: The name of the Secret.namespace: The namespace of the Secret.
UFM Configuration Options
endpoint: UFM API endpoint.insecureSkipVerify: Whether to skip TLS certificate verification. This should only be used in development environments.
RoCE Configuration Options (Currently not supported)
endpoint: RoCE API endpoint.token: RoCE API token.
Label Configuration Options
networkTopologyTypes: The structure that supports different types of network topologies, including those for GPU, NPU, etc. Below is an example of the NPU cluster network topology.topologyA2: The network topology type of A2 (Ascend 910B) cluster.nodeLabel: For the labels on a node, when there are multiple labels, hypernodes are constructed from bottom to top. The bottommost label iskubernetes.io/hostname, which is a standard built-in label key in Kubernetes, and the label above it isvolcano.sh/tor, indicates which tor a node belongs to.
topologyA3: The network topology type of A3 (Ascend 910C) cluster.nodeLabel: For the labels on a node, when there are multiple labels, hypernodes are constructed from bottom to top. The bottommost label iskubernetes.io/hostname, which is a standard built-in label key in Kubernetes, and the label above it isvolcano.sh/hypernodeandvolcano.sh/hypercluster,volcano.sh/hypernodeindicates which hypernode a node belongs to, andvolcano.sh/hyperclusterindicates which hypercluster a node belongs to.
Verification
Check the Volcano controller logs to ensure that the discovery sources are started successfully.
kubectl logs -n volcano-system -l app=volcano-controllers -c volcano-controllers | grep "Successfully started all network topology discoverers"Check the created HyperNode resources.
kubectl get hypernodes -l volcano.sh/network-topology-source=<source>
Replace <source> with the discovery source you configured, such as ufm.
Troubleshooting
- If the discovery sources are not started successfully, check the Volcano controller logs for errors.
- If the HyperNode resources are not created, check the discovery source configuration and ensure that the discovery source is able to connect to the network topology data source.
If users want to implement their own HyperNode discoverer, please refer to: HyperNode Discoverer Development Guide
Manually Creating HyperNodes
If you do not have a network topology auto-discovery tool available in your environment, or if you prefer to define HyperNodes with more fine-grained control, you can choose to create HyperNode CRs manually.
Still using the network topology in Figure 1 as an example, create leaf and non-leaf HyperNodes. This example is for demonstration purposes only; the actual HyperNodes to be created should match the real topology of the cluster.
First, create the leaf HyperNodes s0, s1, s2, and s3.
apiVersion: topology.volcano.sh/v1alpha1
kind: HyperNode
metadata:
  name: s0
spec:
  tier: 1 # s0 is at tier1
  members:
  - type: Node
    selector:
      exactMatch:
        name: "node-0"
  - type: Node
    selector:
      exactMatch:
        name: "node-1"
---
apiVersion: topology.volcano.sh/v1alpha1
kind: HyperNode
metadata:
  name: s1 # s1 is at tier1
spec:
  tier: 1
  members:
  - type: Node
    selector:
      exactMatch:
        name: "node-2"
  - type: Node
    selector:
      exactMatch:
        name: "node-3"
---
apiVersion: topology.volcano.sh/v1alpha1
kind: HyperNode
metadata:
  name: s2 # s2 is at tier1
spec:
  tier: 1
  members:
  - type: Node
    selector:
      exactMatch:
        name: "node-4"
  - type: Node
    selector:
      exactMatch:
        name: "node-5"
---
apiVersion: topology.volcano.sh/v1alpha1
kind: HyperNode
metadata:
  name: s3
spec:
  tier: 1 # s3 is at tier1
  members:
  - type: Node
    selector:
      exactMatch:
        name: "node-6"
  - type: Node
    selector:
      exactMatch:
        name: "node-7"
Then, create the non-leaf HyperNodes s4, s5, and s6.
apiVersion: topology.volcano.sh/v1alpha1
kind: HyperNode
metadata:
  name: s4 # s4 is at tier2
spec:
  tier: 2
  members:
  - type: HyperNode
    selector:
      exactMatch:
        name: "s0"
  - type: HyperNode
    selector:
      exactMatch:
        name: "s1"
---
apiVersion: topology.volcano.sh/v1alpha1
kind: HyperNode
metadata:
  name: s5
spec:
  tier: 2 # s5 is at tier2
  members:
  - type: HyperNode
    selector:
      exactMatch:
        name: "s2"
  - type: HyperNode
    selector:
      exactMatch:
        name: "s3"
---
apiVersion: topology.volcano.sh/v1alpha1
kind: HyperNode
metadata:
  name: s6
spec:
  tier: 3 # s6 is at tier3
  members:
  - type: HyperNode
    selector:
      exactMatch:
        name: "s4"
  - type: HyperNode
    selector:
      exactMatch:
        name: "s5"
Deploying a Job with Topology Constraints
apiVersion: batch.volcano.sh/v1alpha1
kind: Job
metadata:
  name: mindspore-cpu
spec:
  minAvailable: 3
  schedulerName: volcano
  networkTopology: # Set network topology constraints
    mode: hard
    highestTierAllowed: 2
  queue: default
  tasks:
    - replicas: 3
      name: "pod"
      template:
        spec:
          containers:
            - command: ["/bin/bash", "-c", "python /tmp/lenet.py"]
              image: lyd911/mindspore-cpu-example:0.2.0
              imagePullPolicy: IfNotPresent
              name: mindspore-cpu-job
              resources:
                limits:
                  cpu: "1"
                requests:
                  cpu: "1"
          restartPolicy: OnFailure
Since the spec.networkTopology.highestTierAllowed of the Job is set to 2, the expected result is: the job cannot be deployed within the tier 3 HyperNode s6, meaning it can only be deployed to node0-node3 or node4-node7, but not to node0-node7.
Notes
- Non-leaf HyperNodes’ member selectors do not support
regexMatch/labelMatch. regexMatch/exactMatch/labelMatchselectors cannot be configured simultaneously; only one type of selector can be configured.- When a HyperNode’s member is of type
Node, i.e., the HyperNode is a leaf node, it is not allowed to set a member of typeHyperNode. - Leaf HyperNodes contain real nodes in the cluster, so this feature requires the creation of leaf HyperNodes.
- HyperNodes cannot have circular dependencies; otherwise, Jobs cannot be scheduled properly.
- A HyperNode can have multiple child nodes, but a HyperNode can have at most one parent HyperNode; otherwise, Jobs cannot be scheduled properly.
Best Practices
Hard Mode, Soft Mode Selection and Scheduling Overview
hardMode:- All tasks in a job must be scheduled within a single HyperNode tier (or lower) defined by
spec.networkTopology.highestTierAllowed. If a HyperNode satisfying this constraint cannot be found, the job will remain pending. This mode is suitable for scenarios with strict network topology requirements.
- All tasks in a job must be scheduled within a single HyperNode tier (or lower) defined by
softMode:- The scheduler will make a best effort to schedule all tasks of a job into the same HyperNode to optimize network performance. However, if resource demands cannot be met within a single HyperNode, tasks are allowed to be scheduled across different HyperNodes to ensure the job can run. This mode is suitable for scenarios desiring network performance optimization while accepting some scheduling flexibility.
- Scheduling Plugin and Basic Scoring Logic:
- Network topology-aware scheduling relies on the
network-topology-awareplugin. The plugin scoring logic:- The lower the tier of a HyperNode, the higher its score.
- If multiple HyperNodes have the same tier, the HyperNode with more Pods already successfully scheduled for the job will receive a higher score.
- Network topology-aware scheduling relies on the
HyperNode Auto-Discovery Practices
- Volcano uses Kubernetes-standard Secrets to store sensitive credential information (username/password or token). For more stringent key encryption requirements, users should consider additional mechanisms like Encrypting Secret Data at Rest.
- The credential Secrets can be placed in a specified namespace for better isolation.
- For UFM discoverer, the controller only needs read access to the specific Secret containing credentials.
- When deploying in production environments, proper RBAC policies should be configured to limit access to Secrets.
- TLS certificate verification should be enabled in production environments to prevent MITM attacks.
- Monitor the Volcano controller logs for errors.
- Set a reasonable discovery interval to avoid overloading the network topology data source.